3 steps to make your devs love you by preparing custom icons the right way – Liip

For a recent project, we felt it was necessary to ship a few of our own custom icons. Before bringing them over to code, I tidied up the design files. It quickly dawned on me that you should follow a clear protocol to help the development be as efficient as possible. To make your and the life of your developers easier, I want to share the following 3 steps with you. Everybody loves doing less busy work! This write-up focuses on Figma because that’s what we use, but most of the steps should be similar for other design software.

Step 1: Use a single icon component

Self-care is important, so this first one is for my designer buddies: Do yourself a favour and use Figma components. More specifically, use just one component for all icons and then add a variant for each specific icon.
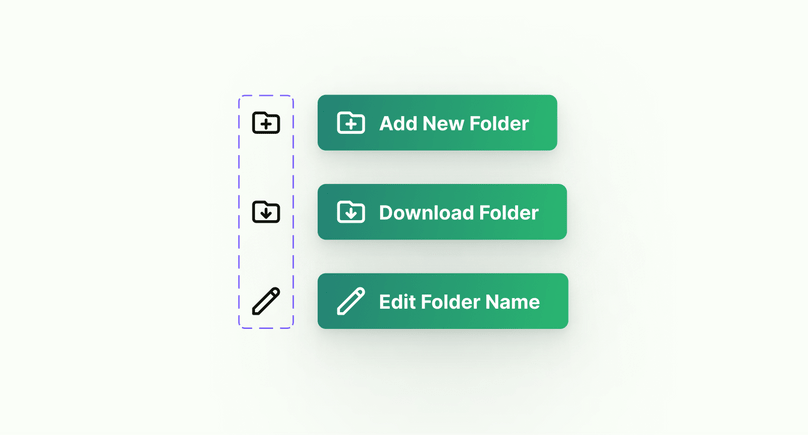
Figma component containing mutliple icons
Putting all your icons in a component makes it easier to reuse them

Unfortunately, selecting the icon variant from the variant dropdown in Figma is a bit clunky. You might be tempted to make a component for each individual icon. That’s good; at least you’re using components. There is, however, a tremendous disadvantage to this.

Most likely, the icon component will at some point be consumed by other components. A button component is a natural example of this. If you want a little icon next to the button label, use a single component and you can just drop in the icon component. Boom! You’re done. What about adding a new icon? Add a variant, update, and it’s available in the button. If you use individual components, you have to add each new one to the button, creating a considerable amount of pointless work.

By the way, this is not exclusive to custom icons. It also helps to do this when dealing with library icons from Figma plugins (which, really, should give you a component to work with, but most of them won’t).

Step 2: Size icons so they have the same aspect ratio

Now that we have the Figma in order for ourselves, we move on to help our devs. To get our custom icons from Figma to code, it is very important that they all can be exported with the same aspect ratio. You don’t feel the pain of this in a design tool, but icons must be treated completely interchangeable in UI code. If different icons have different aspect ratios, that means we potentially have to adapt the whitespace of the button, table, or alert in which we use the icon to keep padding consistent. That means we must review every individual usage. Different sizes generate a lot of individual exceptions in UI code, creating undue extra work for developers. That’s why we say that this is bad architecture: Icons should not influence their parent components, they should be generic. This should be fixed at the source, so it’s on us designers. To prevent fiddling with Figma’s resizing options, create an explicitly sized frame in Figma and drag your icon into it.

Showing how to resize icons by dragging them on a Figma frame
Use a new frame to easily change the whitespace of your icons

We usually don’t encounter this problem because most libraries just export icons as squares. This is certainly the most one-size-fits-all approach, but if all your brand’s icons work better in a 4:3 aspect ratio, then go for it. The important thing is that every icon has the same format.

Step 3: Make sure your icons have similar visual weight

While sizing icons for export, there’s a good chance you will run into an issue where multiple icons in a button bar or a longer form are not balanced right. You correctly put all icons in same-size, same-aspect-ratio containers, but something looks off. Some icons draw the eye more. This is another thing we have to fix that libraries usually provide for us out of the box. Icons that have heavier lines, more filled out areas, or a better fitting shape for our chosen aspect ratio look bigger than others. You can make them smaller or larger within their frame to visually balance them with the other icons in your set.
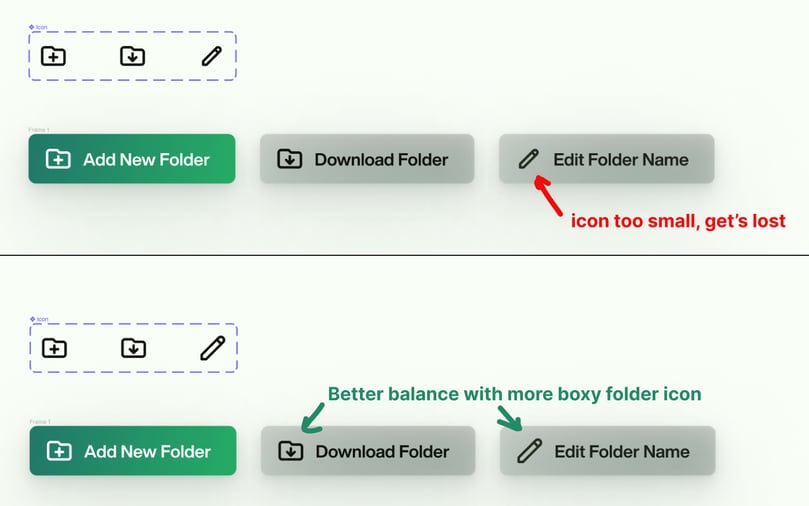
Comparison of icons with balanced and unbalanced whitespace
Make icons have the same visual weight by changing their size

It’s possible you don’t realise this was an issue because you can just resize icons in Figma to deal with it. But that doesn’t work in code, where the size of parent components might be affected. Again, you must fix the root of the problem by not generating exceptions in the first place. Remember, developers could be dealing with hundreds of permutations here, especially if icons can be set in your site’s CMS.

There you go! With the help of Figma’s excellent SVG exporting capabilities, developers should be able to take it from here. These are the steps I would recommend taking with custom icons to make your own and other people’s lives easier. Please try them, I’d love to know how they work for you!


Featured Image by Balázs Kétyi on Unsplash

What is Liip’s contribution to a better world? – Liip

Together with our clients, we want to maximise our impact on sustainable development. We distinguish between the impact on people and the environment resulting from within Liip, and from the projects that we implement. So the HOW and the WHAT. We wrote extensively about the HOW last year.

What are Sustainable Development Goals?

In 2015, the UN adopted the Sustainable Development Goals. The 17 goals set out the key areas of the social, environmental and economic sustainable development that the global community seeks to achieve. Examples include measures on climate action (13) or protecting life below water (14) and on land (15).

We opted for the internationally broadly supported SDGs,because the current proliferation of tools and labels are obstacles more than help. There is currently no single standard, as has been in place for decades for financial accounting, for example.

So that we do not lose an opportunity, we are using the SDGs to collect impact data at a very high level of granularity across all aspects of sustainability.

What exactly are we measuring?

How does the project affect the SDGs? Which SDGs more than others? And what about the company behind it: is there a clear, mandatory message regarding its impact on humans and the environment? We have assigned a percentage weighting to the individual goals. For example, topics such as species protection (14/15) or climate action (13) are weighted much more heavily for a food producer than they would be for a training company.

We then take a look at how strongly connected the project is with the company’s activities. Does the project represent the client’s main area of activity, or is it far removed from its core business? The project’s classification may be congruent with the company, may be separate, or may be a mixture of both.

For each individual aspect, we rate the contribution to a specific sustainability goal on a scale of -2 to +2. We use objective, measurable criteria wherever possible. For example, has a company made a clear and verifiable statement using recognised methods regarding if and how it expects to achieve the climate targets from the Paris Agreement?

Figure 1: Relevance and impact assessment of the individual UN goals of the client project

Of course, there are also assessments for which we lack the data basis. This is a weak point, and we will try to cross-check with recognised agencies wherever possible, especially for large-scale projects.

Figure 2: Sustainability impact of a customer product, composed of company impact (here 80%) and project impact (here 20%)

And how well are we performing?

Our first ‘inventory’ offered a fundamentally good result. Most projects are positively contributing to the SDGs, respectively do not produce any demonstrable damage. This is also thanks to the fact that we have consistently rejected critical projects ever since the company was founded – for example, any projects related to oil production or conflict materials. We are therefore beginning the measurement with a ‘beneficial’ portfolio. Due to the fact that the topic of biodiversity as a whole still receives far too little attention in the economy. This also influences our portfolio. We will pay special attention to this goal.

We now have an overall picture of our activities. This enables us to prioritise specific goals that are not doing so well more strategically.To keep it simple, we multiply the hours worked on a project by the impact on a goal. Admittedly, this is rather imprecise, but it is still meaningful for us because it gives us an indicator of what we are spending our time on in the first place.

Figure 3: Effect of hours worked for clients per SDG

Is this just greenwashing?

There are currently huge amounts of activity relating to impact measurement. And much of this is marginal. Sustainability is currently in fashion, and often things that are brown and unfair are painted green and put in a social light. Because we are aware of this, we are operating as cautiously as possible by setting broad system limits, and by drawing on a holistic metric with the SDGs. And, in the event of doubt, we make a more conservative assessment to avoid a false sense of security. As a point of principle, we obtain publicly available evidence and statements from companies wherever these are available.

What is the next step?

We plan to take this chosen approach

Truncated by Planet PHP, read more at the original (another 517 bytes)

JWT token based authentication for rokka and more – Liip

We do constantly update and improve our image delivery and storage service rokka.io and we’d like to talk about some new feature since the last update here. You can always check the changelog for public additions or follow us on Twitter for the latest and greatest on time updates.

Option for JWT based API Tokens for authentication instead of API Keys

To access the rokka API until now, you needed the API Key which you get on sign up and of which you can create new ones in the Dashboard or via the API. This is fine for most of its use cases, like storing it somewhere on the server side. But maybe not so much when many people, you may not even know, need and have access to such a key. Be it even only with limited rights like for uploading some images or read only access. The problem with rokka’s API keys is that they are valid forever (until you revoke them) and can be used from everywhere.

We could have added time-limitable API Keys, but we chose another path: JWT tokens, which you can get via the API (and an API Key…). They do need an expiry date and can also be IP limited. You can also make them renewable or disallow that. And more limitations could be added in the future.

You most certainly don’t need such tokens, if your code runs on the server side anyway and you don’t need to give out that key to many people or store it somewhere not trustworthy.

But for browser based access to the rokka API directly, there are at least three good use cases for such tokens.

Of course you could run all your communication needed with the rokka API through your backend and wouldn’t need to give out any credentials. But either you do not even have a backend (the rokka Dashboard and the rokka Gallery are just static sites in the end) or you want to avoid unneeded latency and stressed resources on your backend and directly talk to the rokka API from the browser. For example for uploading large images and videos.

The technical details of all this are documented in the authentication chapter of the rokka documentation and our PHP library (in 1.17.0) and the JavaScript library (only in 3.7.0-rc.1 yet, stable release will follow soon) do have already support for all this. And the Dashboard and the Gallery do use these new API tokens already.

But now to three possible use cases:

1. No need to store the API key in the browser, just the limited token

This is what we do in the mentioned dashboard and gallery. People login with their organisation and an API Key, we then fetch an API Token directly from the rokka API and just store that in localStorage, but not the API Key. The token time limited to 3 days, we restrict it by IP (but do remember the last few used ones, so you don’t have to login all the time when switching IPs) and try to renew it after a day. The rokka.js library takes care of most of that, except the multiple IP limiting. The rokka.js file in the dashboard is an example of how to do all that.

Even though the end user still needs to know a valid API Key, at least we don’t store it in the browser permanently. So that if someone could steal the credentials somehow, it will only be valid for 3 days (but can be renewed within those 3 days in the above setup) and more importantly only from the IPs the user itself logged in. We add some additional layers of security this way.

2. Have more control over who has access to it

This is more or less an extension of the above. Let’s say you want to give more granular control to such a site, but not wanting to have to create an API Key for each new user (you could revoke, when the access of a user should be revoked, but that gets cumbersome). You also would lose control of what the users do with such an API Key, like reusing it somewhere else. But you maybe do have a backend already with some single sign on solution and user based access control.

In this scenario, your rokka.js based frontend would then ask your backend for an API token, log in people if they’re not already, the backend generates that token through the rokka API and the (only stored in the backend) API Key, makes it time limited for like a day and marks it as non-renewable. And even can make it IP protected, if that’s what you want.

Truncated by Planet PHP, read more at the original (another 5391 bytes)

Interview with Matthias Noback – Voices of the ElePHPant

Cal Evans hosts his friend Matthias Noback as they talk about Domain Driven Design and Matthias’ new book “Recipes for Decoupling.

This episode is sponsored by
RingCentral Developers

The post Interview with Matthias Noback appeared first on Voices of the ElePHPant.

PHP Internals News: Episode 101: More Partially Supported Callable Deprecations – Derick Rethans

PHP Internals News: Episode 101: More Partially Supported Callable Deprecations

In this episode of “PHP Internals News” I talk with Juliette Reinders Folmer (Website, Twitter, GitHub) about the “More Partially Supported Callable Deprecations” RFC that she has proposed.

The RSS feed for this podcast is https://derickrethans.nl/feed-phpinternalsnews.xml, you can download this episode’s MP3 file, and it’s available on Spotify and iTunes. There is a dedicated website: https://phpinternals.news

Transcript

Derick Rethans 0:14

Hi, I’m Derick. Welcome to PHP internals news, the podcast dedicated to explaining the latest developments in the PHP language. This is episode 101. Today I’m talking with Juliette Reinders Folmer, about the Expand Deprecation Notice Scope for Partially supported Callables RFC that she’s proposing. That’s quite a mouthful. I think you should shorten the title. Juliette, would you please introduce yourself?

Juliette Reinders Folmer 0:37

You’re starting with the hardest questions, because introducing myself is something I never know how to do. So let’s just say I’m a PHP developer and I work in open source, nearly all the time.

Derick Rethans 0:50

Mostly related to WordPress as far as I understand?

Juliette Reinders Folmer 0:52

Nope, mostly related to actually CLI tools. Things like PHP Unit polyfills. Things like PHP Code Sniffer, PHP parallel Lint. I spend the majority of my time on CLI tools, and only a small portion of my time consulting on the things for WordPress, like keeping that cross version compatible.

Derick Rethans 1:12

All right, very well. I actually did not know that. So I learned something new already.

Juliette Reinders Folmer 1:16

Yeah, but it’s nice. You give me the chance now to correct that image. Because I notice a lot of people see me in within the PHP world as the voice of WordPress and vice versa, by the way in WordPress world to see me as far as PHP. And in reality, I do completely different things. There is a perception bias there somewhere and which has slipped in.

Derick Rethans 1:38

It’s good to clear that up then.

Juliette Reinders Folmer 1:39

Yeah, thank you.

Derick Rethans 1:40

Let’s have a chat about the RFC itself then. What is the problem that is RFC is trying to solve?

Juliette Reinders Folmer 1:46

There was an RFC or 8.2 which has already been approved in October, which deprecates partially supported callables. Now for those people listening who do not know enough about that RFC, partially supported callables are callables which you can call via a function like call_user_func that which you can’t assign to variable and then call as a variable. Sometimes you can call them just by using the syntax which you used for defining the callable, so not as variable but as the actual literal.

Derick Rethans 2:20

And as an example here, that is, for example, static colon colon function name, for example.

Juliette Reinders Folmer 2:26

Absolutely, yeah.

Derick Rethans 2:27

Which you can use with call_user_func by having two array elements. You can call it with literal syntax, but you can’t assign it to a variable and then call it. Do I get that, right?

Juliette Re

Truncated by Planet PHP, read more at the original (another 21583 bytes)

Deploy dockerized PHP Apps on a GCP VM [Tutorial Part 8] – Pascal Landau

TODO

  • split article in GCP only and production only

  • add info, that each user via IAP has sudo access by default

    • find docu reference
    • double check the tutorial where a user is used
  • update php-base Dockerfile

    • fix for the git issue ==> add to the git secret tutorial
  • backport the git fix to part 6 and 7

TODO globally replace all IP addresses of the VM. Canonical one is 35.192.212.130
Others: 35.239.69.58, 34.136.107.232

In the eighth part of this tutorial series on developing PHP on Docker we will manually create
a VM on GCP (Google Cloud Platform)
as a “production” environment to deploy our dockerized PHP
application
there and run it via docker compose as a proof of concept.

TODO: Add intro video

Add sectino on “why only a POC”

  • docker compose shold not be used in production, especially true for data stores like mysql and
    redis
  • permissions are far too wide
  • using a Debian base image instead of a COS image

All code samples are publicly available in my
Docker PHP Tutorial repository on github.
You find the branch for this tutorial at
part-8-deploy-docker-compose-php-gcp-poc.

Published parts of the Docker PHP Tutorial

If you want to follow along, please subscribe to the RSS feed
or via email
to get automatic notifications when the next part comes out 🙂

Table of contents

Truncated by Planet PHP, read more at the original (another 162008 bytes)

Much ado about null – Larry Garfield

Much ado about null

Submitted by Larry on 13 May 2022 – 11:24am

null has a controversial history. It’s been called “the billion-dollar mistake” by its creator. Most languages implement null, but those few that do not (such as Rust) are generally lauded for their smart design by eliminating a class of errors entirely. Many developers (myself included) have argued that code that uses null or nullable parameters/returns is intrinsically a code smell to be avoided, while others (also myself included, naturally) have argued that is too draconian of a stance to take.

Anna Filina has a very good three-part series (properties, parameters, and returns) on how to avoid null in PHP generally. Alexis King has a related post (excuse the Haskell) on how to avoid needing edge cases like null in the first place.

However, I want to go a bit deeper and try to understand null from a different angle, and tease out the nuance of why one would really want to use it, and thus what we should be doing instead. To get there we’ll have to go through a tiny little bit of type theory, but it will be quick and painless, I swear.

Continue reading this post on PeakD.

Xdebug Update: April 2022 – Derick Rethans

Xdebug Update: April 2022

In this monthly update I explain what happened with Xdebug development in this past month. These are normally published on the first Tuesday on or after the 5th of each month.

Patreon and GitHub supporters will get it earlier, around the first of each month.

You can become a patron or support me through GitHub Sponsors. I am currently 46% towards my $2,500 per month goal. If you are leading a team or company, then it is also possible to support Xdebug through a subscription.

In April, I spend 29 hours on Xdebug, with 27 hours funded.

the original (another 1331 bytes)